
What is Schedule Builder?
An Online Tool for Class Registration
Schedule Builder is Ivy Tech's portal where students register for classes or view their current schedule. Just like your favorite online store, you can search through the courses available for the upcoming term, add them to your shopping cart, and check out...but in this case, you register. Schedule Builder will generate multiple schedule options based on the courses you put in your shopping cart and then you can pick which schedule works best with your busy life.
Check out the video tutorial or follow our step-by-step instructions to learn how to use Schedule Builder to register for classes.
First-Time Student?
First-time students need to create a MyIvy account before going to Schedule Builder. Learn more in the "Additional Steps for First-Time Students" section below.
When do I use Schedule Builder?
Registering for Classes
Ivy Tech students use Schedule Builder to register for classes before every term. Based on your program, this may be before every eight-week term, 16-week semester, or a custom schedule altogether.
Before you dive into Schedule Builder, we recommend exploring courses and scheduling an appointment with your academic advisor several weeks before a new term starts. Your advisor can help you prepare your schedule in Schedule Builder or simply counsel you on which courses to select when you log into the portal yourself.
To get your first choice of class times and offerings, we recommend that you register for courses at least 30 days (one month) before a new term starts. Of course, you can get a head start when classes first open in mid-September for the spring semester and mid-March for the summer and fall semesters. You can also register right before the term starts, but your course options may be limited by availability.
Reviewing or Emailing Your Schedule
At any time, you can view your current schedule or email it to an advisor, family member, employer, etc., by visiting Schedule Builder and navigating to the Shopping Cart or Current Schedule Page (whichever stage your schedule is in). The button to email your schedule is in the top right of the page.
How to Use Schedule Builder
-
If you are a first-time student, you must take some extra steps to set up your account before using Schedule Builder. Learn more in the "Additional Steps for First Time Students" section below.
TO Open Schedule Builder
1. Log in to MyIvy
2. Select "Student"
This is located on the left side of your screen.
3. Select “Course Info”
This is located on the left side of your screen.
4. Select “Schedule Builder”
This is a green bar link under "Add/Drop Classes" and above "Class Schedule."
-
TO REGISTER FOR CLASSES
The following instructions assume that you are starting on the Schedule Builder main page. If you need help accessing Schedule Builder, follow the steps outlined in the "Steps to Open Schedule Builder" section above.
If you are a first-time student, you must take some extra steps to set up your account before using Schedule Builder. Learn more in the "Additional Steps for First-Time Students" section.
(1) CONFIRM TERM AND LOCATION
a) Select Term
From the main page of Schedule Builder, select the term you wish to register for and click "Save."
b) Select Campus
Select the campus or campuses you wish to see courses from and click "Save."
If you are considering taking online courses, include IvyOnline as a "campus." IvyOnline courses are completed 100% online and allow you to learn on your own schedule, within a certain timeframe. There is no scheduled class meeting time, although the course could involve scheduled activities such as online office hours, chats, or other “real-time” presentations. You can learn more about Online Only (Online—Asynchronous) classes and other class formats here.
c) Verify Your Address
A "Verify Your Address" window will appear. Use the "Click Here" link to view your personal information.
d) Review Your Personal Information
Your personal information will load in a new tab in your Internet browser. If any information is incorrect, choose the info you would like to update, fill out the form that appears, then click "Submit."
e) Confirm Your Address is Correct
Once you have reviewed or updated your personal information, navigate back to the tab of your Internet browser that is called "Schedule Builder," and click the green "My Address is Correct" button.
This will bring you to the Schedule Builder Main Page.
NEXT—IF YOU HAVE AN ACADEMIC PLAN:If you have already created an academic plan with your advisor for the upcoming term, no searching for courses is needed!
- Look for the blue box under "Courses" on the left side of your screen, and click the "click here" link.
- This will replace the blue box with a list of the courses that you and your advisor selected previously.
- Review those courses to make sure they are correct.
- If they are correct, skip to step 3a. If you wish to change them, proceed to step 2.
NEXT—IF YOU DON'T HAVE AN ACADEMIC PLAN:(2) SELECT YOUR COURSES
If you do not have a plan created with an academic advisor or you wish to change the plan listed, follow the steps below.
a) Set Your Course Preferences
Begin searching for courses by setting the filters at the top of your screen to fit your preferences. Enter your preferences for each of the following filters:
- Course Status – Open, Open and full, Open and full with waitlist open
- Campuses – The campuses you selected in step 1b will be applied to the filter, but you can change your selection while searching for classes
- Instruction modes – Traditional, Online Only, Blended Primarily Traditional, Blended Primary Online, Learn Anywhere, Virtual
- Term – The term you selected in step 1a will be applied to the filter, but you can change your selection while searching for classes
- Parts of Term – First/Second/Third/Fourth Four-weeks, First/Second Eight-weeks, 12-weeks, 16-weeks, Early start, Non-standard
b) Go To the "Add Courses" Page
Once filters are set, click the green "+ Add Courses" button in the "Courses" section. This will take you to the "Add Course" page.
c) Select Subject and Course
Use the dropdowns to select your desired "Subject" and "Course."
d) Review Course Descriptions
Once selections are made for each dropdown, a description of the course will appear for you to review. If you need more information about a course, visit the course catalog.
e) Add Courses
Once you have found a course that you would like to take, click the green "+ Add Course" button. Repeat steps 2d and 2e to add more courses.
f) Click Done
When you are done adding courses, click the green "Done" button. This will take you back to the Schedule Builder Main Page with the new course(s) listed in the "Courses" section.
(3) SET YOUR BREAKS
If you have work or other obligations scheduled already, create "Breaks" in Schedule Builder for any times you are unavailable to take classes. This will help Schedule Builder make the optimal course schedule for you.
a) Go To the "Add Break" Page
In the "Breaks" section, click the green "+ Add Break" button. This will take you to the "Add Break" page.
b) Complete the Break Form
On the form, name the reason you are unavailable and set the days of the week and times when you are regularly unavailable then click the green "+ Add Break" button.
Repeat steps 3a and 3b to add more breaks.
(4) Generate & SELECT Your Schedule
a) Generate Your Schedule
Once you've added all courses and breaks, go to the "Schedules" section at the bottom of the page, and click the green "Generate Schedules" button. Schedule options will populate in the section.
You can view the schedules in three ways:
- In-Depth View – Click the "View" link to see full details of the schedule. Each course is listed followed by a chart showing which weeks the course is offered. Under that, a calendar of one week is shown. You can click the "Back" button in the top left of your screen to go back to the list of schedule options.
- Quick View – Hover or click the magnifying glass icon to see a small calendar depiction of the schedule.
- Compare View – You can see two or more of the small calendar views at once to compare schedules. Check the box toward the left of your screen for each schedule you wish to compare. Then click the green "Compare" button at the top of the results list. An overlay will appear for you to review.
Please note that any Online Only courses that allow you to complete coursework whenever you'd like and do not have a set schedule will not show up on a schedule's visual calendar representation.
b) View Your Best Schedule
Once you've found the perfect schedule, click the link to "View" the schedule. This will open a new screen with an in-depth view of the schedule.
c) Save to Your Shopping Cart
Click the green "Send to Shopping Cart" button at the top of your screen. This will take you to the Schedule Builder Shopping Cart Page.
d) Email Your Proposed Schedule
At this point, your schedule is not finalized, but it may be helpful to share it with your academic advisor for review or a family member who needs to know when you will be in class or unavailable for other activities.
If you would like to email your proposed schedule, click the "Email" button in the top right of your screen. You will also be able to print or email the schedule after you have completed your registration.
(5) COMPLETE YOUR REGISTRATION
a) Review Your Shopping Cart
Review your proposed schedule in the Schedule Builder Shopping Cart to make sure it's 100% correct.
b) Edit Cart if Needed
A schedule is not set in stone when it is in the Shopping Cart. You can make changes to it by clicking the "Edit Cart" button in the top right of your screen and repeating any of the steps above as needed.
c) Register
Once you have confirmed the schedule is correct, click the green "Register" button in the top right of your screen.
d) Accept Financial Responsibility
Read the Financial Responsibility Acknowledgement that appears on the screen, and click "Accept" if you wish to proceed.
If you have any concerns about this agreement, please speak with your academic advisor or a member of your local financial aid department.
e) Confirm Acceptance
On the "Please Confirm" overlay, click the green "Continue" button.
f) Save and Continue
To officially complete your registration, click the green "Save and Continue" button.
(6) VIEW YOUR COMPLETED SCHEDULE
An overlay will appear with your Registration Results, which will outline which classes you successfully registered for and which (if any) you are not able to register for.
Any classes that you successfully registered for will now be listed in the "Current Schedule" tab in the green bar at the top of your screen. They will be available in IvyLearn two days before the class's start date.
Unable to Register for a Course
If you are not able to register for a class, the Registration Results will outline why. Please speak with your academic advisor if you believe this reason is in error or if you need help deciding which class to take instead. Any classes that you were not able to register for will remain in your shopping cart until you edit the cart to remove them. The class may offer a waitlist that you can join using the steps outlined in the "Waitlists" section of this page.
Adding Courses
If you would like to add any courses to your current schedule, repeat this process, adding only the new courses in steps 2a–2f above.
-
TO VIEW or EMAIL YOUR SCHEDULE
The following instructions start on the Schedule Builder main page. If you need help accessing Schedule Builder, follow the steps outlined in the "Steps to Open Schedule Builder" section above.
If you are a first-time student, you must take some extra steps to set up your account before to using Schedule Builder. Learn more in the "Additional Steps for First Time Students" section below.
Your Current Schedule
1. Click "Current Schedule"
On the opening screen of Schedule Builder, in the green bar at the top of your screen, click "Current Schedule."
2. Click "Email" & Fill Out Form
Click the "Email" button in the top right of your screen. Complete the short form that appears to send it to your desired recipients.
A Proposed Schedule
For schedules that you previously placed in your Shopping Cart but have not yet finalized (completed registration for), follow these instructions:
1. Click "Shopping Cart"
On the opening screen of Schedule Builder, in the green bar at the top of your screen, click "Shopping Cart."
2. Click "Email" & Fill Out Form
Click the "Email" button in the top right of your screen and complete the short form that appears to send it to your desired recipients.
If you do not see a schedule in your Schedule Builder Shopping Cart, you may need to build your schedule. To learn how to do that as part of the registration process, see the"Steps to Register for Classes" section above.
As a reminder, any schedule in the Schedule Builder Shopping Cart is not final. You must complete steps 5a–5f in the "Steps to Register for Classes" section above to register for the classes.
-
SET UP YOUR MYIVY ACCOUNT
As a first-time student, you will need to set up your MyIvy account prior to registering for classes.
1. Go to MyIvy
The URL is: https://myivy.ivytech.edu/
2. Click “First Time User?”
3. Review the Ivy Tech Community College Acceptable Use Policy, and click “I Agree”
4. Enter the Requested Information
You should have received an email to the address you applied to Ivy Tech with, which includes your Ivy Tech email address.
5. Click “Get Started”
6. Enter Your Personal Information
You should have received an email to the address you applied to Ivy Tech with, which includes your Ivy Tech student ID number.
7. Get a Validation Code
Enter your personal email address and cell phone number and choose your preferred method to receive your validation code.
8. Check “I’m not a robot” and click “Next”
10. Enter Your Validation Code and click “Next”
13. Create Your Password
14. Log In
If you need to register for classes once you are logged in, view the video tutorial towards the top of this page or view step-by-step instructions in the "Steps to Register for Classes" section above.
-
If you are unable to register for a class because it's full, the class will remain in your Schedule Builder Shopping Cart and may display the option to join a waitlist. A waitlist is like standing in line for your turn. If anyone drops the class before it starts, the first person on the waitlist will be notified. If a second person drops the class, the next person on the waitlist will be notified, and so on until the class begins.
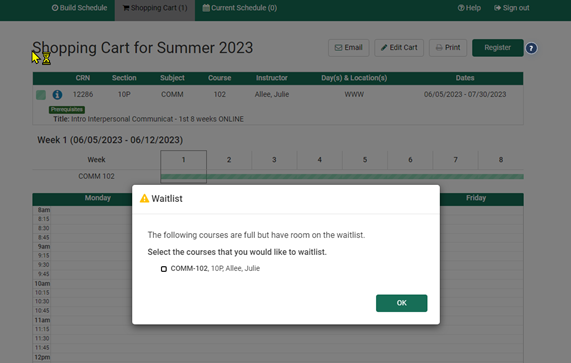
To Join a Waitlist
The waitlist option only shows up when a course is full. You may see a screen like the one below. If you would like to join the waitlist, click the course checkbox and select "OK." Then proceed through the registration steps as normal.
Getting Into the Class
Once you are on a waitlist, check your email in MyIvy each day. If a seat becomes available, you will receive an email notification that a seat is open. You will then have 24 hours to register for the class or the waitlist function will remove you from the waitlist and offer the seat to the next student on the list.
When you are notified that a seat is open for you, go to Schedule Builder and start at step 5 in the "Steps to Register for Classes" container.
Questions?
If you have any questions regarding a waitlist, please contact your local Registrar's Office.
Questions About Schedule Builder?
Contact Your Academic Advisor
Your academic advisor is available to assist with adding or dropping courses, as well as help you navigate any difficulties you may have registering for a course. To find your advisor's name, log in to MyIvy and click Student > Student Dashboard. Scroll to the My Academic Profile section, select your current term in the dropdown menu, and your advisor's name and an email link will display at the bottom.
Tuesdays@TheTech
You can also take advantage of Tuesdays@TheTech by stopping by your local campus on any Tuesday to get personal support and guidance to complete your registration.